Overview
Track8 is built around a tape-style linear workflow with:
- 8 audio tracks
- destructive editing (with multiple undo and 1 redo step)
- real-time FX and automation
🖥 Audio Overview Screen
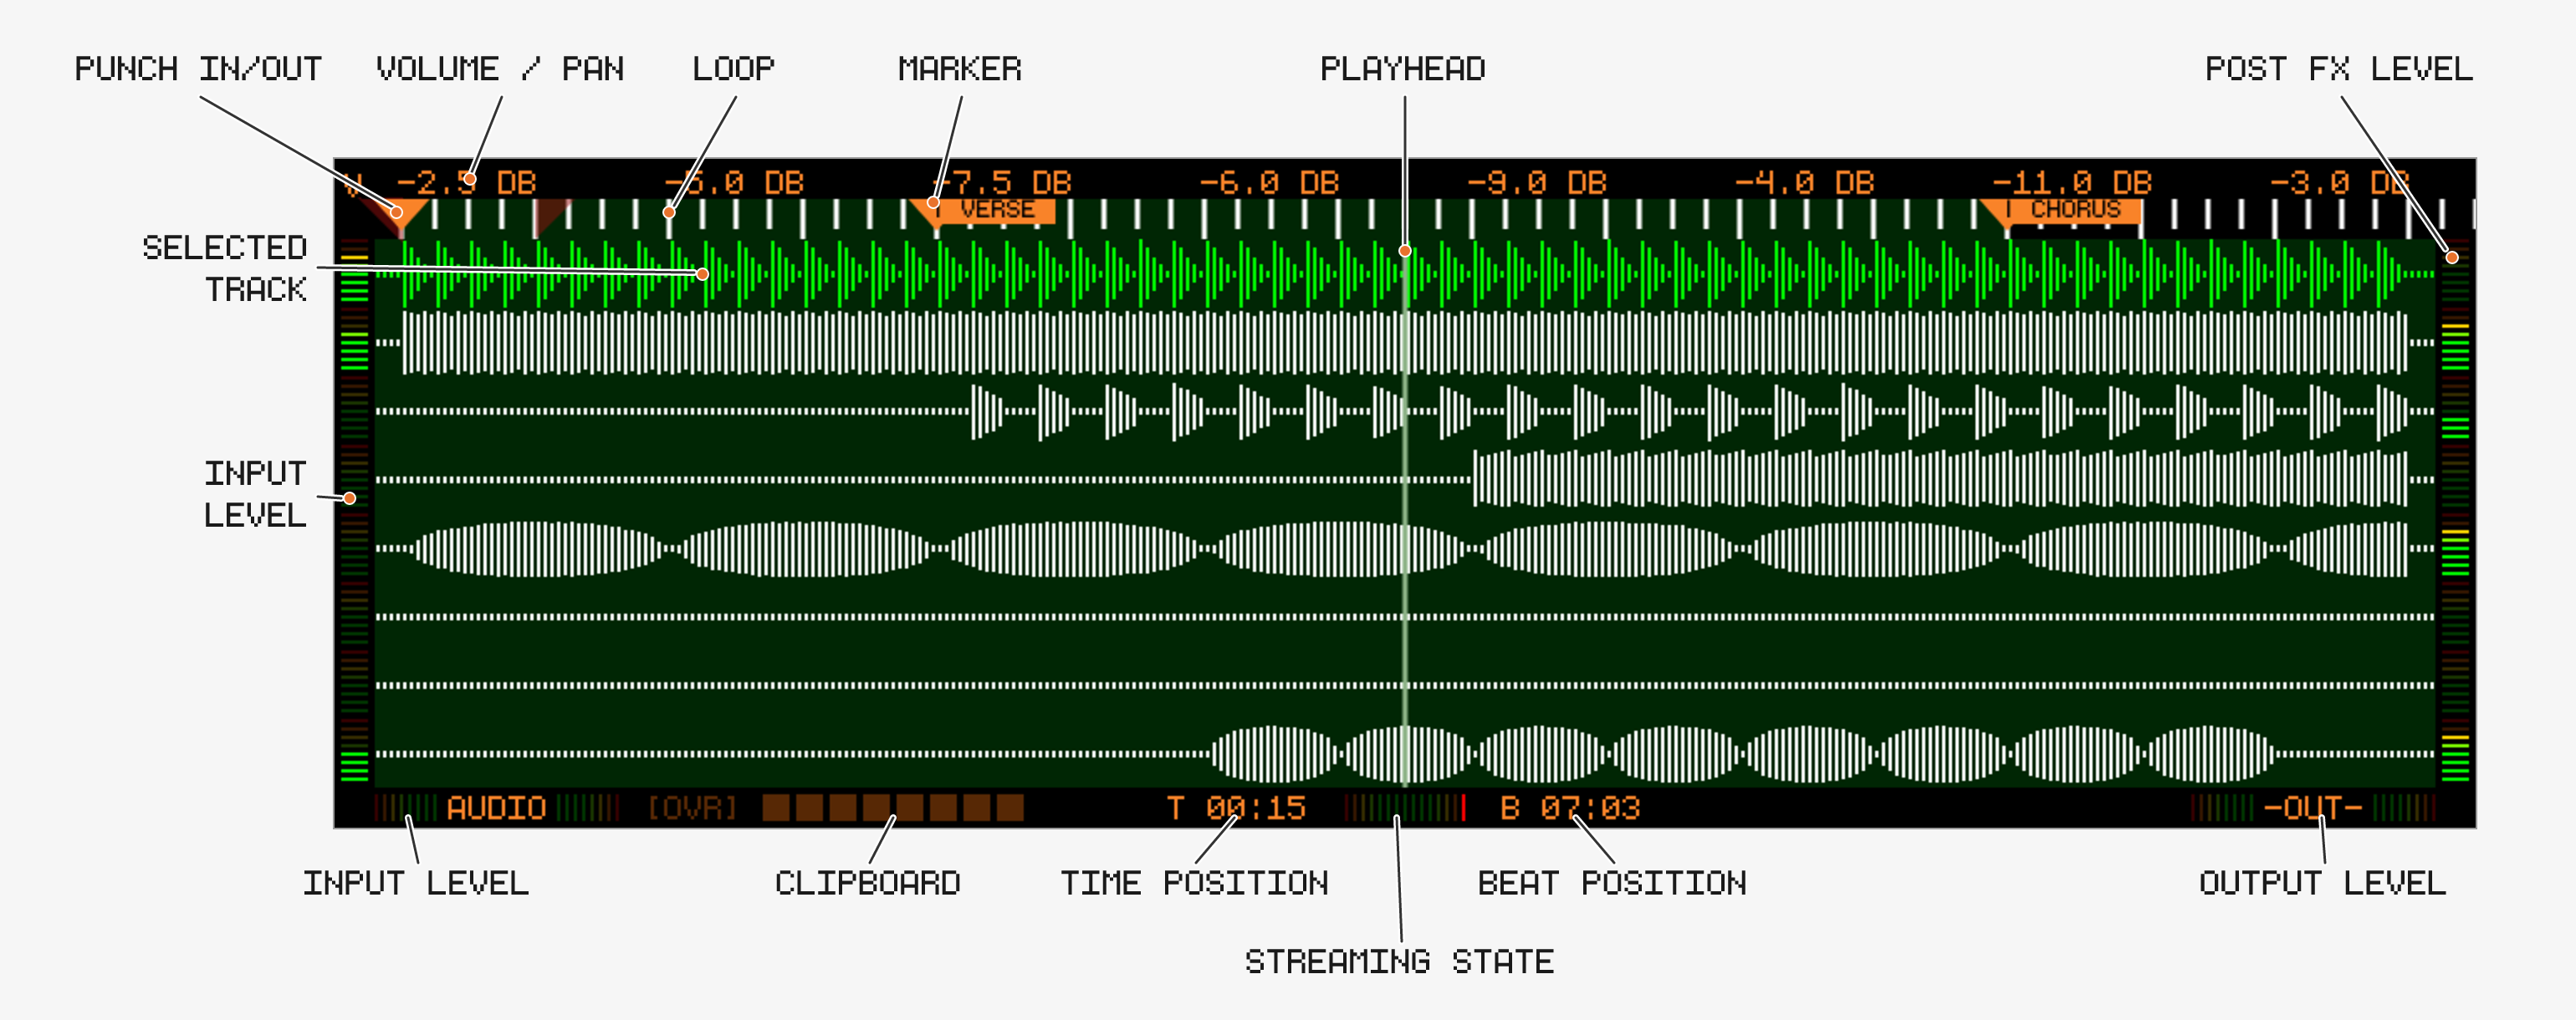
Controls
🎛 Track Encoders
- Press any encoder to cycle through the encoder modes:
- VOLUME → level (per track)
- PAN → stereo position (per track)
- SCROLL → timeline navigation (Encoder 1 sets the scroll increment, Encoder 8 scrolls, Encoder 3 → MOVE MARKER, Encoder 5 → SPLICE, Encoder 7 zooms the timeline 0.25x to 4x (since v1.2.2)). While SCROLL is active, the beat ruler shows the scroll increment as shorter ticks between the beats, like the grid on Audio Edit (since v1.2.2)
- REC OFFSET → per-track record offset, 0 to -50 ms (since v1.1.4)
- RETURN MIX / RETURN VOL → return signal balance and level (external soundcards only)
- VARISPEED → tape speed (since v1.1.5)
- Hold

- Encoder 1 → Volume, 2 → Pan, 3 → Scroll, 4 → Rec Offset, 5 → Return Mix, 6 → Return Vol, 7 → Varispeed
- Hold

🔘 Track Buttons
- Select active track
Track Button→ Mute / Unmute
Track Button→ Solo / Un-solo (since v1.1.2)- Solo tracks are rendered in orange, all other tracks in their muted state
- Solo ignores the Mute state; toggling any Mute exits solo mode
Track Button→ select the same track for both Audio and MIDI (since v1.1.3)


🖥 Related Screens
- Press
✂️ SPLICE — insert / remove time (new in v1.2.2)
Open up blank bars at the playhead, or remove bars so everything after closes the gap — the two things a razor blade does on real tape. One splice moves everything behind the splice point: all 8 audio tracks with their automation, all MIDI tracks, and the markers, loop and punch points.
- Select the SCROLL encoder mode. Encoder 5 becomes SPLICE
- Turn Encoder 5 clockwise to stage blank time at the playhead, one SCROLL step per click (SCROLL at 1/4 → 4 clicks = 1 bar). Turn counter-clockwise to stage a removal instead
- The overview previews the result while you stage: everything behind the splice point is drawn where it will end up — waveforms, MIDI, markers, loop and punch points. An insert shows the blank bars as a highlighted band, a removal shows the tail pulled up to a cut line at the splice point. The encoder label shows the amount, e.g.
+1 bar/-2 beats - Push Encoder 5 to apply. A
SPLICE 0%…100%overlay locks the controls while the tape is rewritten. It shows a time estimate and how much tape is being moved: everything behind the splice point has to be rewritten on every track, so the more tape follows the splice point, the longer it takes (a few seconds per minute of tail on 8 tracks) - Any button press discards the staged splice — PLAY included — and so does turning Encoder 1 (grid) or Encoder 8 (scroll), switching screens, changing the encoder mode, Undo/Redo, a live recording, or turning the amount back to 0. Only Encoder 5 itself and SHIFT leave it alone. Nothing on the tape changes until you push, and there is no audible preview: the drawing is the preview
- The splice point is the playhead position at the first click. To splice somewhere else, scroll there (which discards the staged amount) and stage again
- Markers move with the tape — locked markers and tempo/signature markers too, so the bar/beat readout behind the splice stays what it was. Markers inside a removed span are deleted; loop and punch points inside it collapse to the splice point
- A removal is limited to 1:30 of tape per splice (the removed audio of all 8 tracks stays on the Undo stack, like a Cut). A removal that would swallow a tempo or signature marker is refused — move the playhead past it or remove the variation first
- Audio automation: an insert opens a gap that plays at the fader value; a removal lets the neighbouring points interpolate across the seam. MIDI CC / pitch-bend / aftertouch set inside a removed span carry their last value over to the splice point
- Undo reverts a splice completely — audio, automation, MIDI, and since v1.2.2 also the markers, loop and punch points — from either screen (
UNDO SPLICE n%); Redo re-applies it - The same SPLICE encoder is on the MIDI Overview and does exactly the same thing from there
↔️ MOVE MARKER (new in v1.2.2)
Reposition a marker without recreating it — its label, colour, lock, ▶ start flag, tempo / time signature change and MIDI event all travel with it. Made for adjusting section starts and pre-rolls after the fact (#315).
- Select the SCROLL encoder mode and put the playhead on a marker (the one a Marker press would toggle — jump there with SHIFT + ← →). Encoder 3 reads
MOVE <name>; it stays blank while the playhead is not on a marker - Turn Encoder 3 clockwise to stage a move later, counter-clockwise earlier, one SCROLL step per click (SCROLL at 1/4 → 4 clicks = 1 bar). The label shows the staged amount
- The overview previews the result while you stage: the marker is drawn where it will land, its old place stays as a muted ghost, and
MOVE <name> +2 beats - PUSH to applysits next to it. The playhead rides along with the marker, so it never leaves the screen however far you carry it — set SCROLL to a bar for long trips. Turning back onto the original place clears the staged move and brings the playhead back with the marker - Push Encoder 3 to apply. The playhead stays on the marker at its new place, so you can nudge it again or press Play to hear the new section start right away
- Any other input discards the staged move — a button press, turning another encoder, scrolling, switching screens or encoder modes, Undo / Redo, a live recording. The one exception is Encoder 1: changing the SCROLL step keeps the staged move, so you can travel in bars and land in sixteenths
- The lock does not stop a move: like a SPLICE, a staged-and-pushed move is a deliberate edit, while the lock guards against accidental deletion. Tempo / signature and MIDI-event markers move too — moving a tempo marker moves the grid, MIDI and metronome behind it with it
- Other markers are no obstacle while turning — moving past them reorders the sections. Landing exactly on another marker is settled at push, the way a LOOP Paste treats its destination: an unlocked marker there is replaced (Undo brings it back), a locked, tempo or MIDI-event marker refuses the push (
locked marker there) and keeps the staged move, so one more click past it is all it takes. Nothing moves before the tape start - Undo puts the marker back (
UNDO Marker Move); Redo moves it again. The playhead goes with it both ways, like every other Undo lands on what changed, so Encoder 3 keeps readingMOVE <name>and you can stage the next try straight away - The same MOVE encoder is on the MIDI Overview
🔎 FREE BAR — find the next empty bar (new in v1.2.2)
Looking for room to paste or record without erasing anything? FREE BAR moves the playhead to the next empty bar, so you do not have to scroll for it (#323).
- Touch and hold the track area (about a second) to open Quick Settings, then touch FREE BAR. The panel closes, the playhead jumps and
FREE BAR/BAR 17shows where it landed. The jump is immediate, stopped or playing - A bar is free when, from its bar line for one full bar, all 8 audio tracks stay below -40 dB and no MIDI note sounds on any MIDI track — a note held over from an earlier bar counts. Hiss and room tone under -40 dB count as empty, and so does the very end of a fade-out; MIDI CCs and automation are not looked at
- Bars follow the grid you see: tempo and time signature changes on Markers are taken into account
- Mutes and solos are ignored — a muted track’s material is still material, and the point is never to land on any
- The target is the start of the next gap. If the playhead already stands in a free bar, the rest of that gap is skipped, so touching FREE BAR again walks from gap to gap instead of creeping one bar forward
- Behind the last audio and the last MIDI note everything is free, so the last stop is always the first bar line after your material. From there on,
TAPE IS FREE FROM HEREappears and nothing moves - Blocked while recording, like every other jump
- The same function is on the MIDI Overview and, for a pad or footswitch, as the
Free Barbutton action in MIDI Remote Control - Need room between two sections instead? SPLICE inserts blank bars at the playhead
🎚 Varispeed (since v1.1.5)
Change the tape speed for playback and recording:
- Switch any encoder to VARISPEED mode (
- Encoder 6: switch the display between Percent and Semitones
- Encoder 7: enable / disable Varispeed (disabling resets the speed)
- Encoder 8: adjust the amount
- Percent: -100 % (half speed) to +100 % (double speed)
- Semitones: -12 ST to +12 ST
Limitations:
- Recording with Varispeed is limited to one track — it is disabled when an external audio interface has more than one track armed
- The speed can’t be changed while a recording is running
- Playback audio is degraded; recorded audio is resampled at a higher quality

🎙 Recording Modes (since v1.1.2)
Touch the stereo input meter to cycle between three recording modes:
AUDIO: Default. Records audio only, no automationA+A: Records audio and live automationATM: Records automation only, no audio
In A+A and ATM mode the overview draws automation lines for the currently selected encoder mode (Volume, Pan, Return Mix, Return Vol). While recording is running, turning a track’s encoder writes its moves into that track’s automation lane.
- In
ATMmode every track records — turning any track’s encoder writes into its lane, no track selection or arming needed; inA+Amode automation is only written for the tracks being recorded (new in v1.2.1) - A recorded automation pass undoes as a single step, however many tracks and parameters were ridden (new in v1.2.1)
- The Track Mixer can arm an automation pass directly: pressing

ATMautomatically (new in v1.2.1)

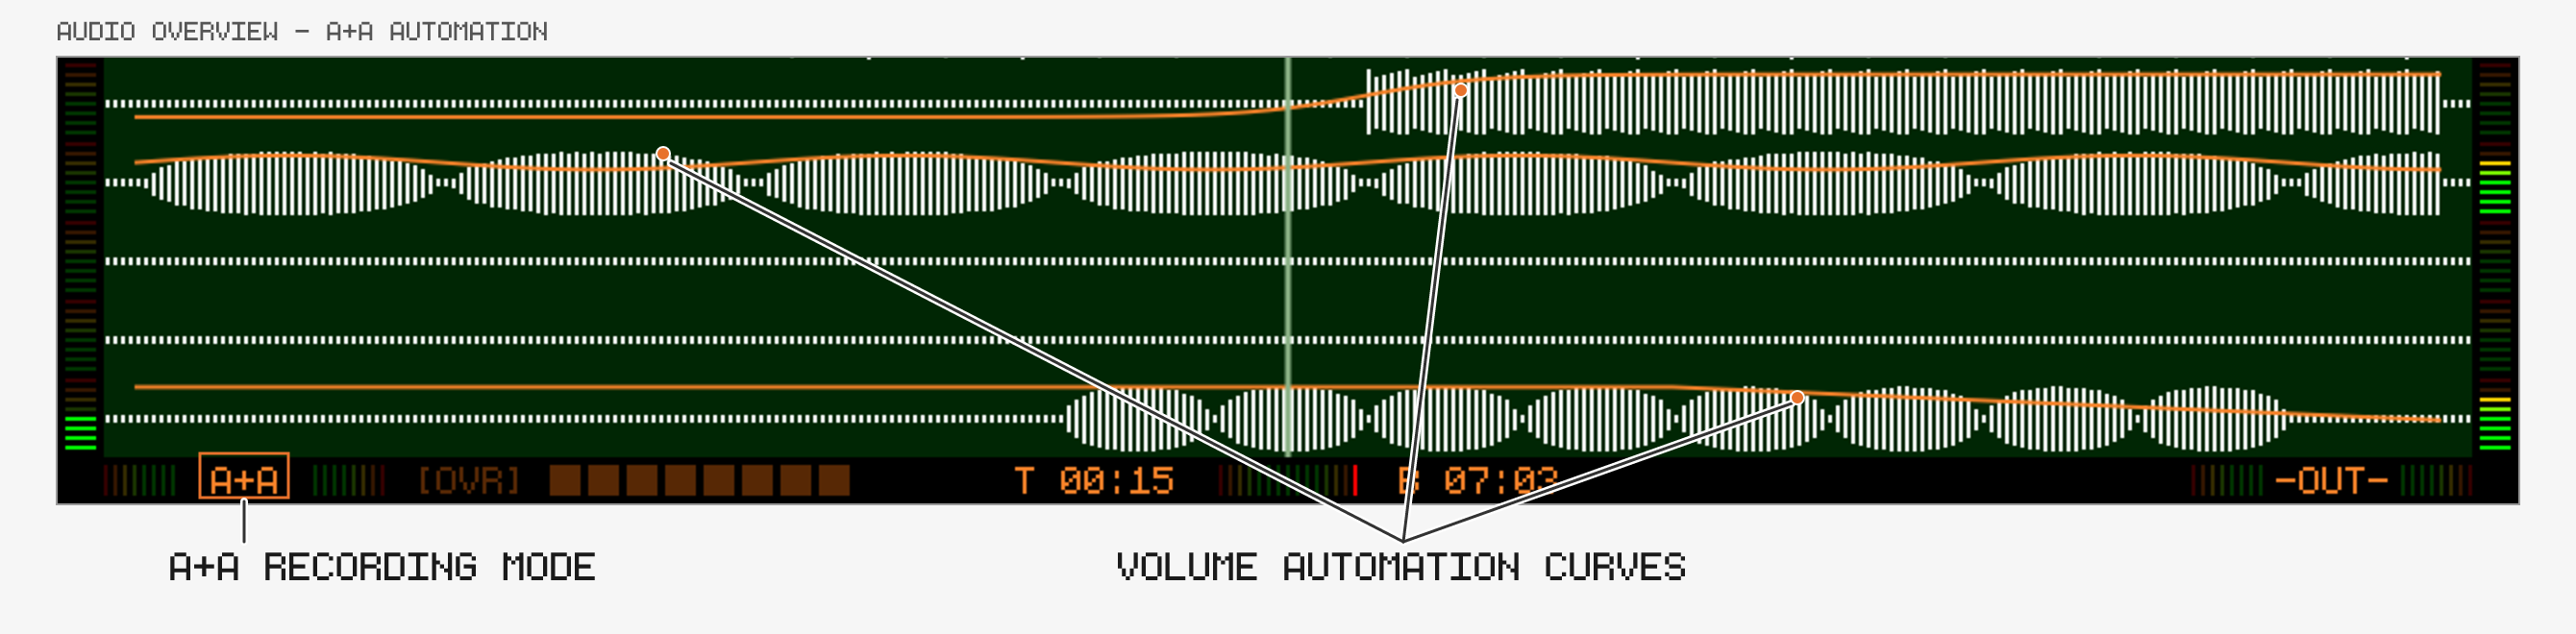
Recording behavior:
- Recording keeps running when switching views (except Settings / USB Browser)
- A running recording is indicated by a red border around the screen edges; actions that would silently stop it show an error instead (new in v1.2.1)
- Touch the overdub indicator to quickly toggle Overdub (since v1.1.4)
🎬 Multi-Take Recording (new in v1.2.1, preview)
Record multiple takes of the same section and pick the best one:
Tip — rehearse the punch: set
AUDIO MON(orMIDI MON) toPUNCHin the Project Settings and the input is only audible while the playhead is inside the punch brackets — even with punch recording off. What you hear on a rehearsal pass is exactly what a recorded pass will sound like (new in v1.2.1).
- Set a Punch In region (best inside a Loop region so the playhead cycles automatically)
- Start playback — each pass through the punch region records a take; the take row appears at the bottom
- Stop and press a
Track Buttonto audition a take (you can also switch takes during playback) - To commit, select the take and exit Punch (

- Pressing
Notes:
- Works for non-Overdub audio recordings only
- Up to 8 takes; take 9 overwrites take 1
Track Buttonstill mutes,Track Buttonstill solos during a take session
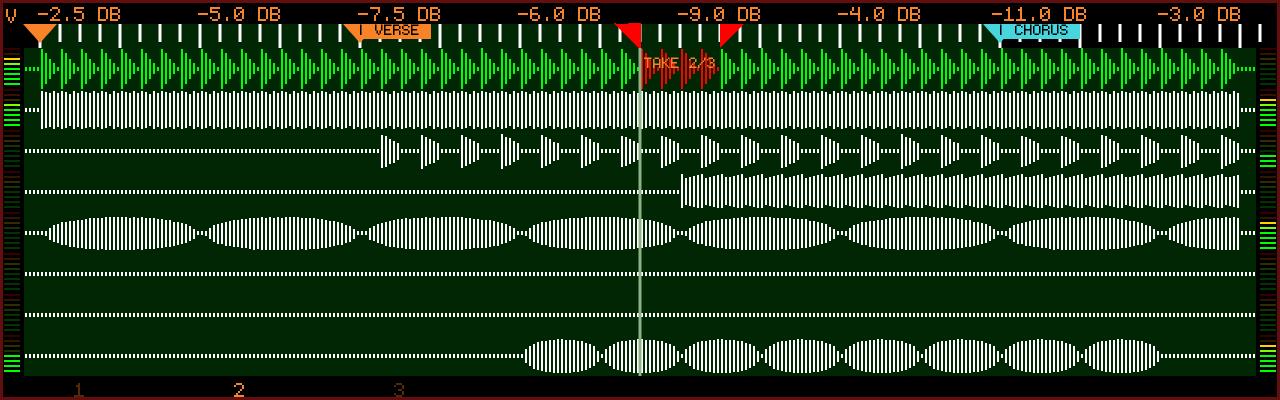
✂️ Comping takes (since v1.2.2)
Stitch the best pieces of several takes into one — the best word or phrase out of each vocal take:
- After the passes, press


- The screen dims down to the take’s track and region and the tape markers hide. Comp markers split the region into sections, each labelled with the take it plays
- Move the playhead into a section and press a
Track Button: the take is picked for that section only. The take row highlights the take of the section under the playhead - Commit as usual — exit Punch (


Notes:
- Comp markers belong to the take session: they are not saved with the project and go away when the session ends
- Setting a comp marker starts the audition, just like pressing a take button: the next Play compares takes instead of recording another pass.
- Up to 31 comp markers (32 sections)
- One Undo after committing still restores the audio from before the session
📊 Meters & Indicators
The level meters read peak in 8 bars of 6 dB each, counted from the red end of the scale. Quieter bars stay lit as the level rises, so the last lit bar is the reading. The per-track meters run bottom-to-top; the stereo -IN- and -OUT- meters run outwards from their label:
| Bar | Color | Lights from |
|---|---|---|
| 1 (red end) | 🔴 Red | -3 dBFS and above |
| 2 | 🟠 Orange | -3 to -9 dBFS |
| 3 | 🟡 Yellow | -9 to -15 dBFS |
| 4 | 🟢 Yellow-green | -15 to -21 dBFS |
| 5-8 (quiet end) | 🟢 Green | -21 to -48 dBFS |
Below -48 dBFS no bar lights.
Input Level
- Shows incoming signal of selected track
- ⚠️ Avoid red → clipping
- Touch to cycle the recording mode (see above)
Post FX Level
- Shows signal after:
- Filter
- Compressor
Output Level
- Final mix after Master FX
- ⚠️ This is your final headroom check
Clipboard Indicator
- Shows which track content was copied from
- Touch it to open the Audio Clipboard Modifier (since v1.1.3)
⏱ Timeline Indicators
- Time Position
- Beat Position
- Loop / Punch markers
- Streaming state
- SSD usage
- Touch and hold the track area (about a second) to open the Quick Settings panel — MKR LEG, MOD HI, BIG TIME, SHIFT HOLD, SHIFT NAV, TIMED JUMP, SHIFT PLAY, PASTE JMP, SCROLL SND, TAPE SND, OVERDUB and the FREE BAR locate, without leaving the overview; see Touch (since v1.2.2)
- Touch the time / beat readout (anywhere from
T 00:00over the streaming indicator toB 01:01) to toggle BIG TIME — a big, translucent overlay on the left half of the screen, readable from across the room: the time / bar-beat readout plus the name of the marker the playhead is in, the next one, and a progress bar with abars:beatscountdown to it — name your markers after chords or song sections and read the changes while playing. The setting is global and shows on both overviews (since v1.2.2) — the same setting as BIG TIME on the Utility screen
Markers
- Markers can be given textual labels (e.g. “Verse”, “Chorus”)
- A label that starts with a number from 1 to 8 (
1 Verse,2. Chorus) makes the marker a locator: theLocate 1…Locate 8button actions of MIDI Remote Control jump straight to it from a pad controller (since v1.2.2) - Markers snap to 1/4 notes — use the Audio Edit view for finer cut/copy/paste work (since v1.1.4)
- Touch marker to edit label
- Everything in the marker edit screen — label, lock, start flag, colour, tempo / time signature and MIDI events — is written together when you press APPLY; the key lights up while something is pending, and EXIT discards all of it (before v1.2.2 the button read
SET LABELand the lock took effect immediately) - MOVE MARKER (Encoder 3 in SCROLL mode) repositions the marker under the playhead by SCROLL steps, with everything it carries (new in v1.2.2)
- A SPLICE moves markers with the tape — locked and tempo markers included — and deletes the markers inside a removed span. Undo of the splice brings them back (new in v1.2.2)
- In the marker edit screen you can:
- Lock / Unlock marker - Locked markers are shown with an
*and cannot be deleted — neither by clear all Markers (MARKER LOCKEDand changes nothing. Unlock the marker here first to delete it (since v1.1.2; true lock against the Marker button new in v1.2.2) - Make it the start marker — the “start from here” point for repeated takes: while a marker carries the flag,

SHIFT PLAYin Utility is set to (the setting showsSTART MKRmeanwhile). Push Encoder 8 to switch the flag button from the lock to ▶ (START ON/START OFF), then turn Encoder 8 up for on, down for off — or touch the button to toggle it; push again to return to the lock (like every other push-cycled encoder: push picks the function, turn sets it). Only one marker can be the start marker — flagging another one moves the flag. The start marker shows a ▶ in its head; deleting it hands - Change BPM and Time Signature at the marker position (since v1.1.3)
- Applies to all content after the marker, or until the next marker with a tempo change
- Also affects existing MIDI notes, MIDI Clock and the Metronome
- Markers that change the tempo or time signature (or send MIDI events) are always considered locked — to delete one, switch that change off first
- FIT — find the tempo of an off-grid recording (since v1.2.2): set a marker on a downbeat and another one a few downbeats later, then edit the first marker. Hold
FIT 4 BARS = 97.3 BPM: turn Encoder 1 to say how many bars lie between the two markers (1–64; set the time signature on Encoders 2/3 first), push Encoder 1 to take that tempo — the tempo / time signature change switches on and the BPM keeps one decimal.APPLYwrites it and moves the second marker onto the downbeat of bar N + 1, so it stays where you placed it by ear. The audio is not stretched; only the grid, MIDI, clock and metronome follow. ShowsNO NEXT MKRon the last marker andOUT OF RANGEwhen the bar count gives a tempo outside 30–360 BPM
- Send MIDI events to external gear when the playhead crosses the
marker (new in v1.2.1):
- Encoder 4 picks what Encoders 5/6 edit:
-(no MIDI event — turning back to-clears it),TRANSorPROG. A marker sends one or the other — setting one clears the other TRANS— Encoder 5:---/START/STOP. Sends MIDI Start or Stop at the marker, e.g. to kick a drum machine’s pattern in at the chorus or stop an external sequencer for a breakdown. Only while Track8 is MIDI Clock Master; independent of theTRANSPORTsend setting. WithCLOCKon, the message is aligned to the next clock tick like Track8’s own transportPROG— Encoder 5: channel (CH 1…16, starts on the selected MIDI track’s channel), Encoder 6:PROG 1…128(turn below1→---removes the program change); push Encoder 6 to switch Encoder 6 toBANK 1…128(Bank Select MSB). One event per marker; use two markers for two devices or for a program change plus a transport command- Program changes are caught up: on play start, locate and loop wrap the latest program change at or before the playhead is re-sent per channel, so a synth is in the right patch when you start mid-song. Transport events fire only when the marker is actually crossed
- Markers with MIDI events show an
Mon the marker head and count as locked, like tempo / signature markers — set the event back to-to delete the marker (since v1.2.2)
- Encoder 4 picks what Encoders 5/6 edit:
- Colour-code the marker with Encoder 7 (
COLOR) — turn to cycle through the regular marker colour plus red, yellow, green, cyan, blue, purple, pink and white; push to go back to the regular colour. TheCOLORlabel is drawn in the selected colour as a preview. The marker head, its label background and its marker leg all follow, which makes sections easy to tell apart when scrolling a long project (new in v1.2.1)
- Lock / Unlock marker - Locked markers are shown with an
UTILITY→MKR LEGdraws a vertical line under each marker for easier visual reference (since v1.1.4)- Press




📦 Clipboard System
-
Cut/Copy/Paste (



-
Hold
-
Only unmuted tracks are included in Cut/Copy All Operations (
- A soloed track counts as the only unmuted one: solo a track and the multi-track Cut/Copy takes just that track, no matter how the other Mutes are set (since v1.2.2)- The Clipboard is kept in Memory, and will be cleared when shutting down the device
-
Touch the clipboard indicator to open the Audio Clipboard Modifier and process the clipboard content
Arrange Audio, MIDI and Markers together with LOOP
Hold 


- The Loop region is used on both sides — set it by hand, or snap it to the surrounding Marker bounds with
- Like
- Paste puts every copied track back on its own track — also when only a single track was copied. There is no bouncing here: the multi-track clipboard keeps its layout on both sides
- Paste replaces the destination on both sides for the length of the copied loop: every copied track is written back — the audio is overwritten and the MIDI events in that span are cleared before the clipboard is written, so nothing of the old section bleeds into the new one. A track that was silent in the copied section comes out silent at the destination too, on the MIDI side as on the audio side (since v1.2.2); before, a MIDI track without events in the section left the destination’s events in place. Tracks that were muted at copy time are not part of the section and are left alone
- To clear or copy one track over the loop region and leave the Markers alone — e.g. to remove a lead that runs through twenty chord Markers — take the loop into Region Editing: Audio Edit, Track Button 7, push
SLIDE(Encoder 4), Cut (since v1.2.2) - Mute every track, audio and MIDI, and LOOP + Copy/Paste moves just the Markers of a section — Undo takes them back like any other LOOP Paste (since v1.2.2)
- Both clipboards are used, so LOOP + Cut/Copy replaces whatever was in them
- It works on the Audio Overview and the MIDI Overview — it does the same thing from either side
- Keep
- Each action confirms on screen:
Copy Loop: Audio + MIDI + Markers,Cut Loop: Audio + MIDI + Markers,Paste Audio + MIDI + Markers. When Mutes leave audio tracks out of the section, the overlay counts what is actually taken —Copy Loop: 7/8 Tracks + MIDI + Markers, orNo Audio (muted)when every audio track is muted — so a track skipped as muted shows up right at the Copy, not later as a hole in the Paste - The Markers inside the loop travel with the section. A Marker region can never contain Markers (it ends at the next one); a loop can span as many as you like
- Cut/Copy stores every Marker inside the loop — label, colour, lock, tempo / time signature change, MIDI events — with its distance to the loop start in real time, so a tempo change inside the section still lines up with the pasted audio
- A Marker sitting exactly on the loop end bracket counts as part of the section and travels too. Pasting puts it right on the destination’s end bracket — unless a Marker already sits there, which keeps its place. Cut never deletes it: a Marker on the end bracket just as much marks the start of the section behind the loop, which a Cut leaves untouched (since v1.2.2)
- Paste replaces the unlocked Markers in the destination span, the same way it replaces the audio and MIDI there. Locked Markers and Markers with a tempo / signature change or a MIDI event stay put — a paste is no way around the lock; a pasted Marker that would land exactly on one of them is skipped
- Cut removes the unlocked Markers inside the loop; locked ones stay. Markers behind the loop are not moved (Cut clears the region, it does not close the gap — use SPLICE for that)
- The ▶ start flag is never copied — there is only one start marker per project and it stays where it is
- Only LOOP + Cut/Copy fills the Marker clipboard; every other Cut/Copy and a sample import replace it, so a later LOOP + Paste never pairs fresh audio with another section’s Markers
- One Undo reverts both halves. After a LOOP Cut or Paste, a plain Undo (
Record) takes the audio and the MIDI side back — Markers included — from either screen, and showsUNDO Audio + MIDI. Redo (- This holds as long as the LOOP edit is the newest thing on both sides. Edit one domain on its own afterwards and Undo stays per-domain: on that domain’s screen it reverts the newer edit first — the LOOP edit underneath is only covered up, not lost: undo that edit and the following Undo pairs both domains again. On the other screen it reverts that side’s half on its own, and from then on the two halves are undone and redone independently
- It also holds for a section without MIDI events, or without audio: both sides keep an entry for every LOOP Paste, even one that had nothing to write on that side (shown as
UNDO Loop Pastewhen undone on its own) (since v1.2.2) - Once the two halves have come apart, the Markers go back with whichever half is undone first, and return with whichever half is redone first (since v1.2.2)
- v1.2.1 introduced this as
The clipboard can hold 12 minutes of audio in total (since v1.2.1). This has the following implications on the Workflow:
- At most 12 minutes of audio can be Cut/Copied
- If you Cut/Copy Multiple tracks, the sum can’t be greater than 12 minutes
- Cut/Copy 8 tracks → The area can be 1.5 minutes long
Workflow helpers:
UTILITY→PASTE JMP: when enabled, Paste moves the playhead to the end of the pasted region, so you can quickly fill the tape with a repeating pattern (since v1.2.0)UTILITY→MOD HI: highlights all modified (pasted/cut) areas in orange until the next clipboard operation or view switch (since v1.1.4)- During multi-take recording nothing is highlighted while the takes are still open — a pass stopped half way no longer leaves its span painted through take switching and comping. The kept take is highlighted once the session ends with punch off (since v1.2.2)
UTILITY→MKR LEG: marker legs stop at the track area, like the waveform, so the input/output meters and I/O indicators stay clear of them (since v1.2.2)- Every Cut/Copy/Paste confirms with a short overlay, e.g.
COPY/Copy all tracks to ClipboardorPASTE/Paste to Track 3: Drums. For long operations the overlay stays up and locks the controls until the audio is safely written to disk, then lingers a moment as the same confirmation (new in v1.2.1)- The bounce confirmation (
Bounce 7 Tracks to Track 1) counts the tracks the Clipboard actually holds — what the mixdown really mixes — not the tracks currently unmuted in the Mixer (since v1.2.2; before, muting or unmuting between Copy and Paste made the count wrong)
- The bounce confirmation (
🚀 Undo / Redo
For Audio there is an Undo Stack of 12 minutes (since v1.2.1).
- Every audio operation (record, cut, paste, nudge, automation edit) moves the previous audio on the Undo stack
- As the Stack is capped at 12 minutes, older Undo steps get discarded
- As the Undo Stack has the same size as the Cut/Copy Limit, you can always undo once
- Undo moves the playhead to the start of the undone region (new in v1.2.1)
- Undo and Redo confirm what they touched with a short overlay, e.g.
UNDO Track 3: Drums,UNDO all tracks,REDO Automation(new in v1.2.1) - In two low-memory situations the device frees history early — always with an on-screen message:
CLIPBOARD CLEAREDandUNDO HISTORY TRIMMED(new in v1.2.1)
Redo was introduced in v1.1.2
- To Redo, hold
- You can Redo only once
🎧 Monitoring Behavior
- The input signal is always routed / monitored through the selected track
- The input signal will be effected by the selected tracks TrackFX (

- Monitoring can be disabled in the Project Settings
- for acoustic instruments for example
- when using microphones/speakers to avoid feedback

🎚 Gain Staging (Important)
Typical flow: Input Gain → Track Volume → Master FX → Mastering → Output
Best practice:
- Keep input clean (no clipping)
- Use Track Volume for balance
- Use Mastering for final loudness