User Interface
Track8 follows a simple and consistent interaction model. This page explains the core concepts — for the exhaustive, per-screen list of every control see the Controls & Shortcuts Reference.
Core Principles
🎛 Track Encoders
- Control the parameters shown at the top of the screen
- Press an encoder to switch its parameter mode
- A
^symbol marks encoders that have a secondary push function (since v1.1.3) - Hold SHIFT while turning for fine-grained steps (since v1.1.4)
- Hold SHIFT while pressing to switch encoder modes without the mode overlay interruption (since v1.1.2)
- Hold an encoder for 2 seconds to open MIDI Learn — see MIDI Remote Control (since v1.1.4)
🔘 Track Buttons
- Select tracks
- Trigger the actions shown at the bottom of the screen
- Shift = alternate function (e.g. SHIFT + Track Button = mute)
⇧ Shift Button
- Enables secondary actions
- Context-dependent
🎯 Visual Feedback
- Active elements = bright
- Inactive = dimmed
- A red border around the screen edges means record is armed (faded) or a take is rolling (solid). It is visible on every screen (new in v1.2.1)
- While a take is rolling, actions that would break the recording (changing BPM, switching the record domain, opening heavy screens) are refused with an on-screen error instead of silently stopping the take (new in v1.2.1)
- The status bar at the bottom of the Overview screens shows the active
recording mode, the overdub state and the current time/beat position.
Bars and beats are counted from 1, so the start of the tape reads
01:01(changed in v1.2.1 — it used to read00:01):

👆 Touch
-
Screens that accept touch input show a small
[TOUCH]indicator (new in v1.2.1) -
Quick Settings: touch and hold the track area of the Audio or MIDI Overview for about a second to open a panel of the everyday toggles that otherwise live on the Utility screen (since v1.2.2):
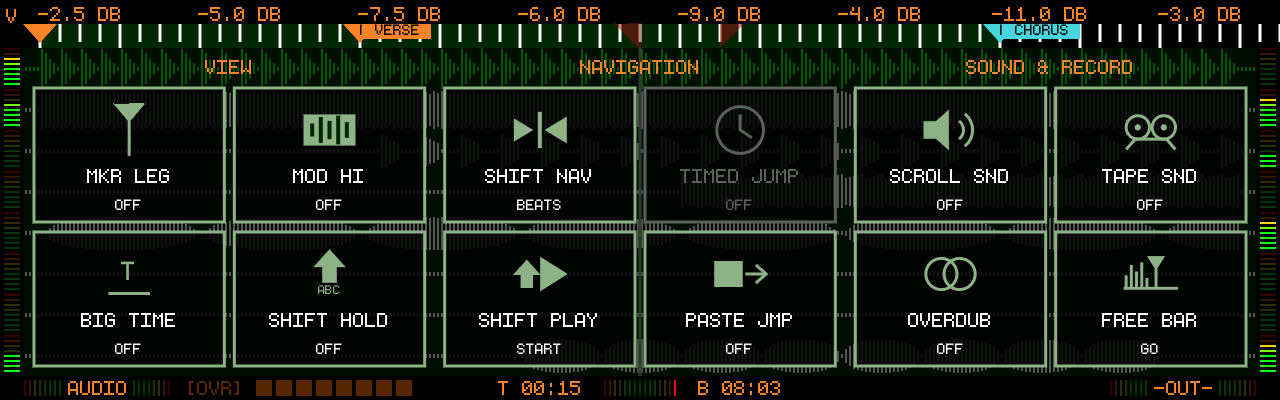
- VIEW: MKR LEG, MOD HI, BIG TIME, SHIFT HOLD — NAVIGATION: SHIFT NAV, TIMED JUMP, SHIFT PLAY, PASTE JMP — SOUND & RECORD: SCROLL SND, TAPE SND, OVERDUB, FREE BAR
- Touch a tile to switch it (TIMED JUMP, SHIFT PLAY and TAPE SND cycle through their values); lit tiles are on. TIMED JUMP is greyed out while SHIFT NAV is set to BEATS
- FREE BAR is the one tile that acts instead of switching: it closes the panel and moves the playhead to the next empty bar on the tape — the next place to paste or record without erasing anything. See FREE BAR. Greyed out while recording
- Touch anywhere outside the tiles to close the panel. Any button or encoder closes it as well and still does its normal job — Play plays, the screen keys switch screens
- A short tap on the tracks still does what it always did (e.g. touching a marker edits its label), and the panel is a shortcut only: every setting stays on the Utility screen
-
A USB mouse scroll wheel or a jog wheel behaves like the SCROLL encoder in the Audio/MIDI Overview and Edit views (since v1.1.1)
Buttons and Shortcuts
Screens
-

-
-

-

-


-
-
-


Screen Button Cycles
Pressing a screen button again while already on its screen cycles through a family of related views:
- Audio → Audio Overview ↔ Track Mixer (new in v1.2.1)
- Settings → Settings ↔ Utility (new in v1.2.1) — the classic route via the UTILITY track button still works
- Master FX → Master FX → Mastering → External Inputs (External Inputs only with an external soundcard) (new in v1.2.1)
- SHIFT + Master FX → Track FX ↔ Track Sends (Track Sends only with an external soundcard) (new in v1.2.1)
Hold Shortcuts
- Hold Audio + Track Button — solo/unsolo an audio track on the Audio Overview (since v1.1.2)
- Hold Midi + Track Button — solo/unsolo a MIDI track on the Midi Overview (since v1.1.2)
- Hold Audio + Midi, then press a Track Button — select the same track for both Audio and MIDI (since v1.1.3)
- Hold Settings, then press Audio — open the Soundcard settings
- Hold Settings, then press Midi — open the MIDI settings
- Hold Loop + Cut/Copy/Paste — arrange the current loop region: all unmuted tracks (a soloed track counts as the only unmuted one), Audio + MIDI, with the Markers inside the loop instead of marker bounds (Audio Overview since v1.2.1, MIDI Overview since v1.2.2)
- Press Loop In + Loop Out together — set the loop region to the surrounding marker bounds; with SHIFT the punch region (since v1.2.0)
Edit
-
-

-
-
-
-
-
-
-



After a paste the playhead can jump to the end of the pasted region to chain
pastes into a repeating pattern — enable PASTE JMP in Utility
(since v1.2.0). Pasted/modified areas can be highlighted in orange via
MOD HI in Utility (since v1.1.4).
Playback Control
-
-
-
-

-
-
-
-
-
Undo during a take: SHIFT + Record stops playback, undoes the take and moves the playhead back to where recording started (new in v1.2.1)
-
Redo: hold SHIFT and push Encoder 8 — one redo step after an undo, separate for Audio and MIDI (since v1.1.2)


Navigation
-
-

-
-
-
SHIFT PLAYin Utility (since v1.1.5) — or to the start marker whenever one is flagged (new in v1.2.2) -
SHIFT NAVin Utility) -
SHIFT NAVin Utility)


The Left/Right buttons also navigate the tape while on the Track FX, Master FX and Mastering screens (new in v1.2.1).
For every control on every screen, see the Controls & Shortcuts Reference.