Track Mixer
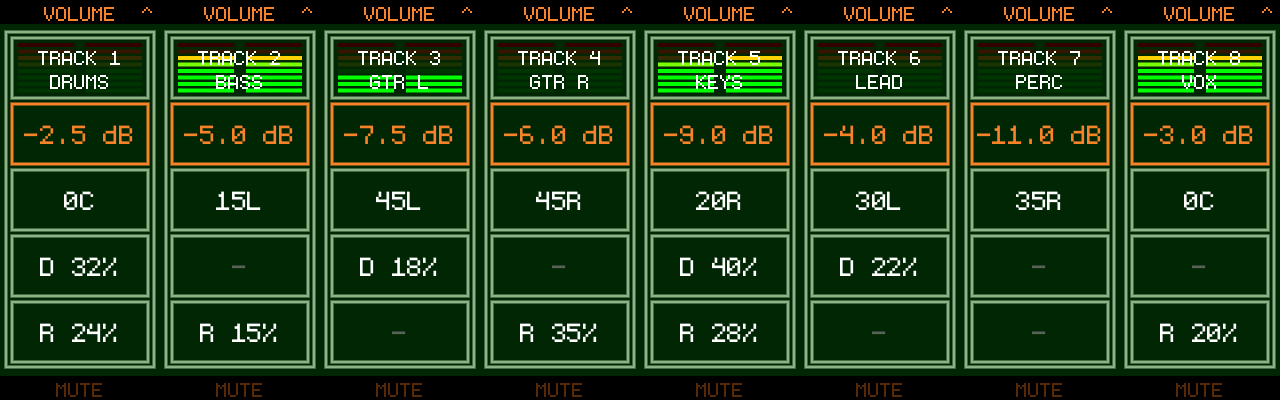
The Track Mixer (new in v1.2.1) shows all 8 audio tracks as classic mixer strips — level meter, volume, pan and the delay/reverb sends side by side — so you can balance a whole mix from one screen.
Opening the Mixer
- Press




Channel Strips
Each strip shows, top to bottom:
- Output level meter (stereo)
TRACK nand the track nameVOLUMEin dBPAND— Delay send in %R— Reverb send in %
The strip meter shows the track’s post-fader output on the same 6 dB-per-bar scale as the Audio Overview meters: red at the top is 0 dBFS, and a track pushed past 0 dBFS by its own volume holds the red bar lit.
Muted strips are dimmed — including tracks silenced because another track is soloed. On silent tracks the MUTE button label lights up at full contrast: it is the way back. While a solo is active the soloed track’s label reads SOLO instead.
Full Meter View
Touch the level meters to expand them into a full-height meter view (new in v1.2.1):
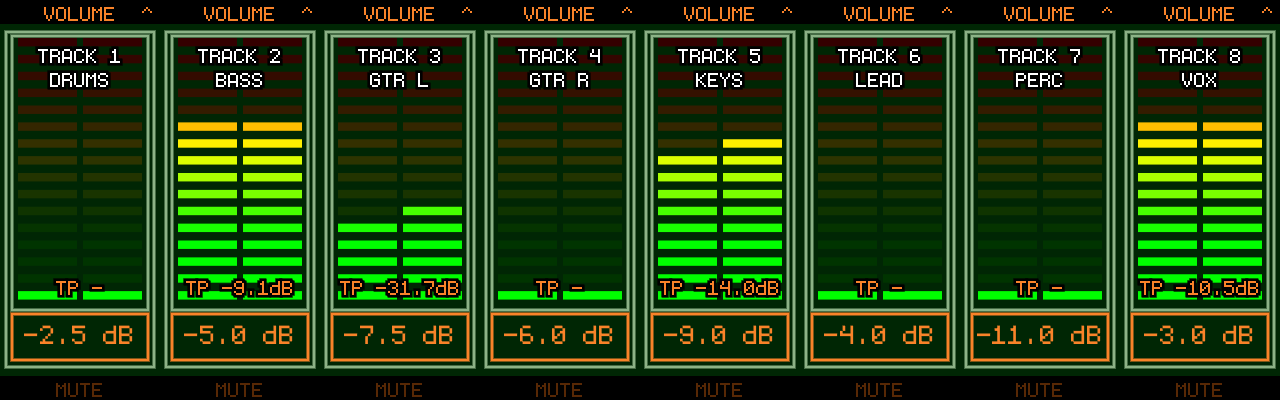
- The meters use the finer Mastering-screen scale — 16 bars from +12 dBFS down to −55 dBFS, about 4 dB per bar
TPat the bottom of each meter is the track’s True Peak (dBTP) over the last 3 seconds, the same measurement as theTP 3sreadout on the Mastering screen. It reads-while the track is silent. Ideal for gain staging — e.g. aim your input peaks at −12 dB- The box at the bottom shows each strip’s active parameter; the encoders keep working exactly as before (turn to adjust, push to cycle), as do mutes, solo, automation recording and Copy/Cut/Paste. Touching the box cycles the parameter, like pushing the encoder (since v1.2.2)
Touch the meters again to return to the normal channel strips. The mixer remembers which view you left it in.
Controls
Encoders
- Encoder n adjusts the active parameter of strip n
- Push the encoder to cycle its strip’s parameter:
VOLUME→PAN→D(Delay send) →R(Reverb send) - Touch a parameter box (
VOLUME,PAN,DorR) to make it the strip’s active parameter directly — one touch instead of up to three pushes (since v1.2.2) - Each strip remembers its own parameter — you can ride volume on one track and a send on another
- Hold
- Turning a send encoder switches that send on automatically so the change is audible immediately; switching a send off is done on the Track FX screen
Track Buttons
Track Buttonn toggles Mute for track n (noTrack Button→ Solo / Un-solo, the same gesture as on the Audio Overview (new in v1.2.1)- Solo ignores the Mute states; while a solo is active, pressing any track button exits solo mode
Transport



Automation
- Press

ATM(automation only — recording from this screen never touches audio) and Record is armed; press Play and ride away (new in v1.2.1) - In
ATMmode every track records: turning any strip’s encoder writes into its automation lane — no track selection or arming needed (new in v1.2.1) - While an automation-recording pass is running (
ATM, orA+Astarted from the Audio Overview), the value flashes in the recording color while writing - A recorded automation pass undoes as a single step, no matter how many tracks and parameters you rode (in
A+Amode the audio take and the automation pass are separate undo steps) (new in v1.2.1) - Values driven by an automation lane are rendered green and follow the playhead
- The
DandRsends record into their Track FX automation lanes - To edit the recorded curve afterwards, use

Copy / Cut / Paste Mixer Values
The edit keys work on the mixer itself here, not on the tape:





Only the mixer values are touched: automation lanes, mutes and the rest of each track’s FX chain are left alone.
MIDI Remote Control
Mixer encoders support MIDI Learn: hold an encoder for 2 seconds to open the MIDI Learn modal and map an external controller to that strip’s parameters. See MIDI Remote Control.